
Steelcraft HD grille guard and front package
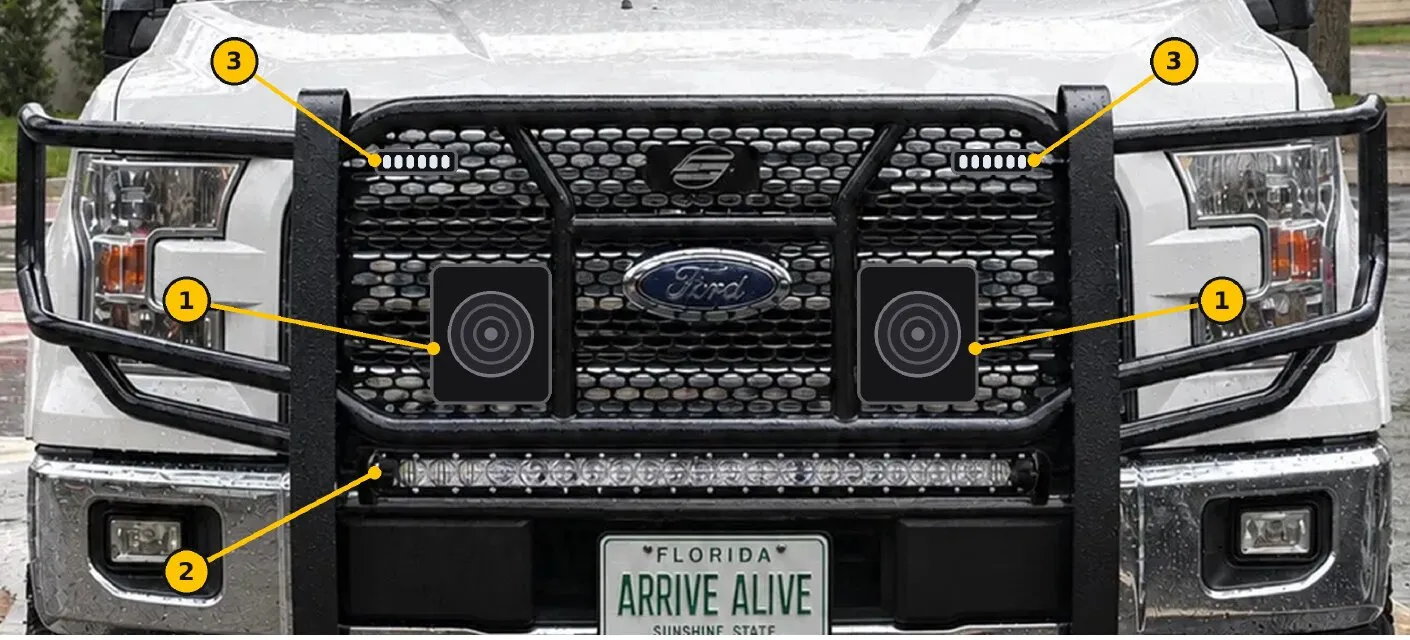
The grille guard carries the whole front package. Install steps, hardware, torque notes, component layout and the mounting hardware list.
Mount the whole front warning package on the grille guard, so the bumper and factory grille are never cut or drilled, and so the package can come off with the guard.
Constraints
Section titled “Constraints”- 2017 F-150 Lariat SuperCrew. The guard is Steelcraft’s 2015 to 2017 fitment.
- The bumper stays on. No changes to the bumper or factory grille.
- Every ground goes to the side of a steel frame rail or the Ford Q-231 ground point, because the body is aluminum. Never “chassis near the guard.” Whether the guard’s brackets make a good ground path is unknown, so they aren’t relied on.
- Everything is mounted to the guard and bench-tested first, then a shop bolts the guard on.
Steelcraft HD Grille Guard
- Part
- 50-1420C
- Fitment
- 2015 to 2017 F-150 (Short top brackets)
- Bought
- Used, $450.00
- Mounting
- Frame rails at the tow hook location, plus two top brackets behind the bumper
- Finish care
- Mild soap only, no abrasive polish or wax (Steelcraft)
Front package layout
Section titled “Front package layout”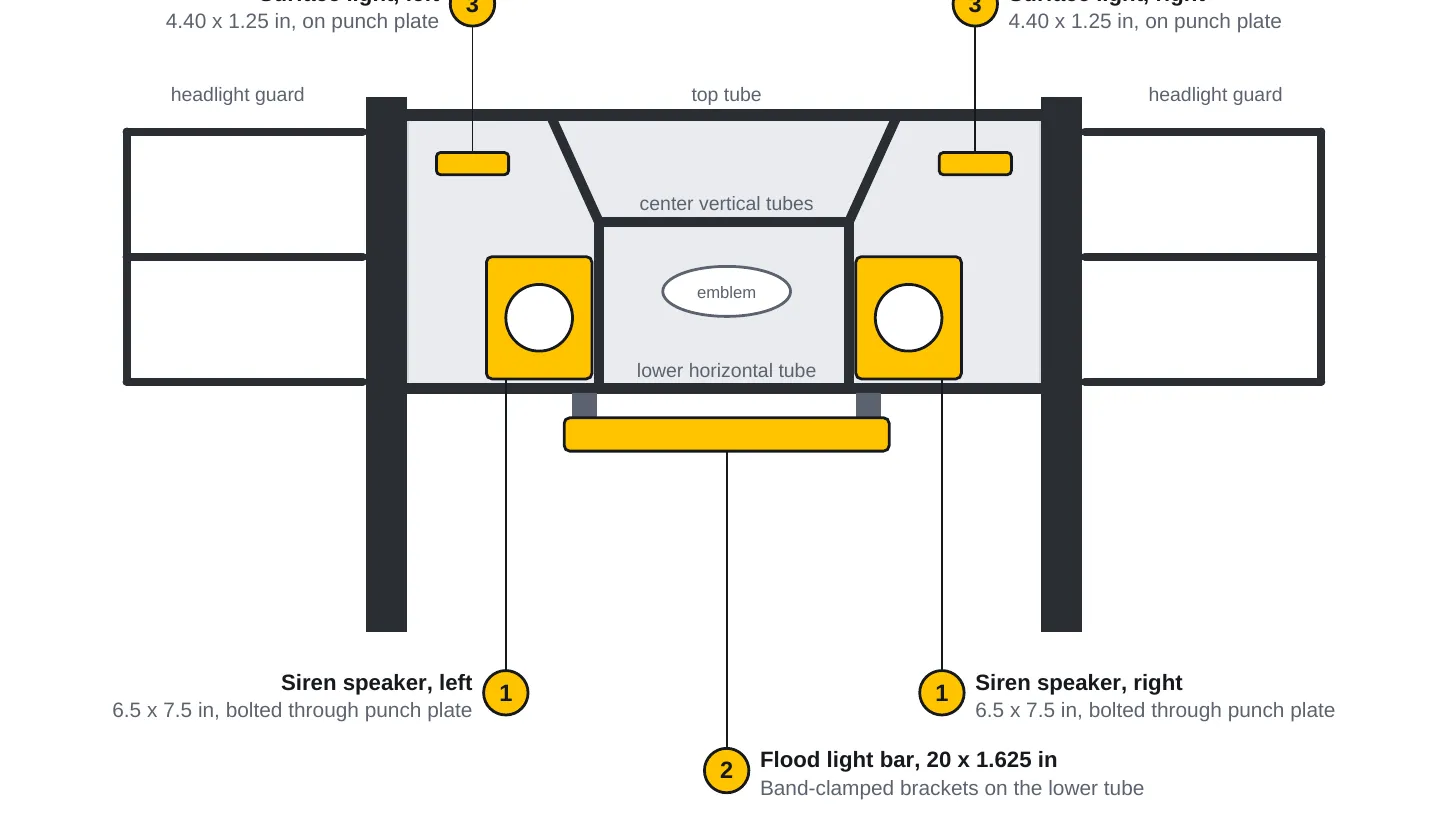
| # | Component | Qty | Size and draw | Location | Mounting |
|---|---|---|---|---|---|
| 1 | UBL 100W Large Siren Speaker | 2 | 7.5 H x 6.5 W x 3.5 D in with bracket. 11 Ω, 120 to 124 dB (listing) | Above the lower horizontal tube, against the outside of each center vertical tube | Included L-bracket bolted through the punch plate with stainless hardware and aluminum backing plates |
| 2 | UBL Color Flood 2.0 20” light bar | 1 | 20 x 1.625 x 3 in. 3.3A max (108W), 10 to 30V | Under the lower horizontal tube, above the plate | Thin stainless band clamps strap a bracket to the lower tube at each end, and the end-cap brackets bolt to those |
| 3 | UBL U-Lite surface mount light, amber/white | 2 | 4.40 x 1.25 x 0.40 in. 350 mA max each, 12V | Upper left and right corners of the punch plate | Screwed through the plate with backing strips |
Electrically, the speakers run in parallel on the siren output (two 11 Ω = 5.5 Ω, Whelen’s minimum). The light bar and the pair of U-Lites each take one 10A switched output. Each U-Lite draws more than a 250 mA low-current output can supply, so they can’t go on those. The full assignment is on the output plan, and the light bar’s wire-by-wire table is on its own component page.
Mounting hardware
Section titled “Mounting hardware”All stainless where it’s exposed. Rubber goes between brackets, plate and tubes to stop rattles and galvanic contact.
| Part | Qty | Use |
|---|---|---|
| Stainless hex bolts, 1/4”-20 x 1” | 1 five-pack | Two per speaker |
| Stainless nylon-insert lock nuts, 1/4”-20 | 1 pack | One per bolt |
| Stainless flat washers, 1/4” | 4 | Under bolt heads |
| Aluminum flat bar, 1” x 3 ft x 1/8” | 1 | Cut into two speaker backing plates and two surface-light backing strips |
| Neoprene sheet, 1/16” | 1 | Isolation between brackets, plate and tubes (old inner tube works too) |
| Stainless band clamps, No. 28 (1-1/4” to 2-1/4”) | 1 ten-pack | Two per light bar bracket; the thin band passes behind the tube |
| Stainless corner braces, 1-1/2” | 1 four-pack | One per end, strapped under the tube, carries the end-cap bracket |
| Stainless bolts and nyloc nuts | 2 sets | End-cap bracket to corner brace |
| Stainless machine screws, #8-32 x 3/4”, with nyloc nuts and washers | 4 each | Two per surface light, through the plate slots |
| Flat black rust-preventive spray | 1 | Touch-up on drilled or enlarged holes |
Grille guard install
Section titled “Grille guard install”This follows the AmericanTrucks install video for order, tools and tightening sequence. Hardware sizes and the parts list come from Steelcraft’s own install sheet. Where the two differ, both are noted.
Before starting
Section titled “Before starting”- It’s heavy. The video rates it 2 of 3 on difficulty because of the weight and uses two helpers to lift it.
- The bumper stays on. Steelcraft’s sheet removes the bumper only to reach the top bracket bolt, which the video reaches from underneath.
- Tow hooks still work afterward. The bracket goes between the tow hook and the frame, and the hook bolts back on over it.
- Front camera: a grille camera’s view would be blocked. Steelcraft says to remove the guard’s center screen in that case.
- With the UBL gear already mounted: lift only by the guard’s frame, never by the light bar or speakers. Coil and tape the wires to the guard first, and check that the light bar clears the bumper before final tightening.
| Tool | Used for |
|---|---|
| 3/8” drive impact or ratchet and extension | Running bolts in |
| 18 mm socket | Frame bracket bolts (M12) |
| 16 mm socket + 17 mm wrench | Guard to lower bracket bolts (M10) |
| 13 mm socket + 13 mm wrench | Top bracket bolts (M8) |
| Torque wrench (borrowable from parts stores) | Final tightening |
Hardware in the box
Section titled “Hardware in the box”| Qty | Part |
|---|---|
| 1 | HD grille guard |
| 1 each | Left and right lower frame brackets |
| 1 pair | Short top brackets (the 2015 to 2017 set, use these) |
| Tall (2018 to 2020) and 2021-on top brackets: not used on a 2017 | |
| 2 | 12 mm double nut plates |
| 4 | M12-1.75 x 35 mm bolts, lock washers, flat washers (frame) |
| 4 | M10-1.5 x 30 mm bolts, 8 flat washers, 4 nylon lock nuts (guard to lower brackets) |
| 2 | M8-1.25 x 50 mm bolts, lock and flat washers (top brackets to truck) |
| 2 | M8-1.25 x 30 mm bolts, 4 flat washers, 2 nylon lock nuts (top brackets to guard) |
The three top bracket designs look alike. Sort them first and set the Short pair aside.
- Lower frame brackets. Remove the tow hooks. Slide a nut plate inside the end of the frame rail and line it up with the holes. Start two M12 x 35 mm bolts (lock washer and flat washer each) up through the bracket and frame into the nut plate. Start only, don’t tighten. Repeat on the other side.
- Top brackets. Behind the bumper, remove the bolt at the top center of the bumper bracket. Slide the Short top bracket in. From underneath, fit the M8 x 50 mm bolt with lock and flat washers. Set the bracket’s plate straight up and down and tighten this bolt fully (Steelcraft). Repeat.
- Hang the guard. With helpers holding it against the outside of the lower brackets, fit the four M10 bolts from the outside in, washer and nylon lock nut inside. Snug only.
- Top mounts. Bolt each top bracket to the guard with M8 x 30 mm, outside in, washer and nylon lock nut. Snug only.
- Center, set the angle, tighten in this order: center the guard side to side; tilt it to the angle wanted and tighten the lower guard bolts (16/17 mm); then the top bracket bolts (13 mm); then the frame bolts last (18 mm).
- Finish. Reinstall the tow hooks over the brackets with their factory bolts. Re-check all hardware after the first 100 to 200 miles, then periodically (Steelcraft).
Torque
Section titled “Torque”| Bolt | Where | Approx. torque |
|---|---|---|
| M8 (13 mm) | Top brackets | 18 to 20 ft-lb |
| M10 (16/17 mm) | Guard to lower brackets | 35 to 40 ft-lb |
| M12 (18 mm) | Lower brackets to frame | 60 to 65 ft-lb |
| Tow hook bolts | Factory | Ford’s spec for the truck |
Wiring to the cab
Section titled “Wiring to the cab”- 16 AWG speaker wire and the light wiring in split loom through the grille to the module under the rear seat.
- Rubber grommets at every metal pass-through, using a factory firewall grommet where possible.
- Both speakers in parallel with matched polarity: CanTrol orange to each speaker’s white, brown to each speaker’s black.
- Dedicated ground wires to a frame rail side, not the guard.
- The guard wiring stays coiled in loom on the guard until wiring day.
Testing and verification
Section titled “Testing and verification”| Item | Status |
|---|---|
| Light bar wire functions | Bench-tested 11 October 2026 on the test amp |
| Light bar, U-Lites, speakers on the CanTrol | Planned. See the bench test plan |
| Speaker fit in the punch plate bays | Not measured yet |
| Guard mock-up, hand tight | Not done yet |
| Guard bolted to the truck | Not done yet |
Safety notes
Section titled “Safety notes”- Lift the guard by its frame only.
- Measure speaker fit and every bracket hole before drilling. Paint any drilled or enlarged hole.
- Third-party speakers work with Whelen controllers but don’t carry Whelen’s SAE, California Title 13 or NFPA certification for the system.
Open items
Section titled “Open items”- Confirm the tube OD and plate gap with calipers.
- Confirm the speaker bracket hole size and the bolt length.
- Confirm a 1/4”-28 nut fits the speaker’s own bolt with two threads showing.
- Mock up the full package hand tight, then permanent, then the shop install.
- Confirm the torque values with Steelcraft.
Sources
Section titled “Sources”- AmericanTrucks: 2015 to 2017 F-150 HD grille guard review and install
- Steelcraft HD grille guard install sheet, 2015 to 2024 F-150
- Steelcraft install sheet on SEMA Data (50-1420cx)
- Product page (CARiD)
- My grille guard siren and lighting proposal, 5 October 2026 (in the project files)
Changelog
Section titled “Changelog”Grille guard page published from the Steelcraft install notes and the 5 October front package proposal.
Rollback: Revert the commit that added this page.