
Quest Angler 10' Upfit
A DIY 12 V plan for a 10-foot rotomolded fishing boat. Trolling motor circuit, fused 4-gang switch panel, fish finder on the motor shaft, nav and courtesy lights, paddle, anchor, foam deck and Georgia registration, in budget, mid and high tiers.
Turn a bare 10-foot Quest Angler 10 rotomolded fishing boat, already fitted with a Minn Kota Endura C2 30 lb tiller trolling motor, into a complete small fishing rig: a powered fish finder, front and side lighting through one switch panel, legal navigation lights, a paddle and anchor, foam decking, and Georgia registration. The client does the labor, so the plan is parts-only, with step-by-step install instructions. The target was a budget build under $1,000 in parts, with mid and high tiers alongside for comparison.
Screenshots
Section titled “Screenshots”From the plan document (revision E, 22 October 2026).

The boat
- Hull
- Quest Angler 10, rotomolded polyethylene
- Length / beam
- 10 ft 3 in / 4 ft 1.5 in
- Deck height
- 1 ft 8 in
- Hull weight
- 138 lb
- Max capacity
- 525 lb
- Motor
- Minn Kota Endura C2, 30 lb thrust, 30 A max draw, 5 ft factory 10 AWG leads
- Registration
- Georgia
- Budget build
- About $655 in parts (midpoint of ranges), tax and shipping extra
Constraints
Section titled “Constraints”- Plastic hull. No hull ground, so a dedicated negative bus bar. Polyethylene also rules out 3M 5200 and most adhesives without a primer.
- Don’t touch the motor leads. Minn Kota says not to extend or alter the 30 lb motor’s factory leads, so the battery has to sit at the stern within reach of the 5 ft leads.
- Weight. Two adults plus the motor and gear leave about 75 lb of the 525 lb capacity for the battery. A Group 27 lead-acid battery (roughly 55 to 65 lb, estimate) fits, but tightly.
- Client-supplied battery and charger. Their type, chemistry, size and age set runtime and charger mode, and still need confirming.
- Drill as little as possible, above the waterline only.
Layout
Section titled “Layout”The plan places every part on the hull with a numbered marker:
- Endura on the transom notch, with the fish finder transducer on its shaft.
- Battery box strapped to the floor just ahead of the transom, within reach of the 5 ft leads, with the 40 A breaker on the box.
- Switch panel and fish finder display on the gunwale shelf beside the stern seat, reachable while steering.
- All-round white stern light on a plug-in pole.
- Red/green bi-color bow light, centered on the bow deck.
- Anchor line to the bow cleat (or a trolley pulley in the mid build).
- Paddle clips on the inner side wall.
- EVA floor mat, loose-laid.
- LED courtesy strip under both gunwale lips.
Budget build: parts list
Section titled “Budget build: parts list”| Part | SKU | Price paid | Key specs | Source | Status |
|---|---|---|---|---|---|
| 12 V deep-cycle marine battery (client-supplied) | TBD | $0 | Type, chemistry, group size, Ah and age to confirm | TBD | Planned |
| 12 V charger (client-supplied) | TBD | $0 | Must have a mode for the battery chemistry | TBD | Planned |
| Battery box with strap, Group 24/27 or 31 | TBD | $18–25 (est.) | Strap anchored to floor pads or through-bolted eye straps | TBD | Planned |
| 40 A waterproof marine manual-reset circuit breaker | TBD | $15–25 (est.) | Surface mount, within 7 in of the battery + post | TBD | Planned |
| 4-gang rocker switch panel with fuses, dual USB, voltmeter | TBD | $25–35 (est.) | On a Starboard plate on the gunwale shelf | TBD | Planned |
| Wiring kit | TBD | $40–55 (est.) | 25 ft 16/2 tinned duplex, 1 ft red 10 AWG jumper, 15 A inline ATC fuse holder, negative bus bar, heat-shrink ring terminals, split loom, clamps, grommets | TBD | Planned |
| Garmin STRIKER Vivid 4cv with GT20-TM transducer | TBD | $199.99 (verified) | Includes transom and trolling-motor mounts; 0.40 A draw | Manufacturer | Planned |
| Starboard (HDPE) sheet, 12 × 12 × 1/2 in | TBD | $18–25 (est.) | Panel/display plate and breaker pad | TBD | Planned |
| Attwood LightArmor bi-color LED bow light, 2 nm | TBD | $41.99 (verified) | Black composite deck mount, through-bolted with a backing plate | Manufacturer | Planned |
| Plug-in LED all-round white pole light with deck base | TBD | $30–45 (est.) | Attwood or Seachoice | TBD | Planned |
| IP68 12 V LED strip, 2 × 5 ft | TBD | $20–30 (est.) | White or green, under each gunwale lip | TBD | Planned |
| Telescoping paddle (4–6 ft) plus 2 clips | TBD | $35–45 (est.) | TBD | TBD | Planned |
| 3.5 lb folding grapnel anchor kit, 40–50 ft line, buoy | TBD | $25–35 (est.) | TBD | TBD | Planned |
| EVA foam sheet, about 94 × 35 in, 6 mm | TBD | $60–80 (est.) | Loose floor mat cut from a template | TBD | Planned |
| Fasteners | TBD | $20–30 (est.) | #10 well nuts, 316 stainless bolts, fender washers, butyl tape | TBD | Planned |
| Georgia registration, 3 years, under 16 ft | TBD | $35 (est.) | Numbers and decals on both sides of the bow | TBD | Planned |
Optional battery upgrade: if the client battery is a starting battery, more than 3 to 4 years old, or too heavy, the LiTime 12V 50Ah TM ($239.99, verified) is the recommended replacement. It weighs about 13 to 15 lb (estimate) and gives roughly 1.6 hours at the motor’s full 30 A. A lithium-capable charger is needed if the client’s charger has no LiFePO4 mode.
Not included: PFDs, a whistle and trailer items. Georgia requires one wearable PFD per person.
Budget, mid and high tiers
Section titled “Budget, mid and high tiers”| System | Budget | Mid | High |
|---|---|---|---|
| Battery | Client battery | LiTime 12V 100Ah TM plus a LiFePO4 charger | Dakota Lithium 12V 100Ah |
| Switch panel | Generic 4-gang with fuses, USB, voltmeter | Blue Sea 4321 breaker panel with 12 V socket and USB | Blue Sea WeatherDeck breaker panel plus Blue Sea 4304 IP67 fuse panel |
| Fish finder | STRIKER Vivid 4cv | Humminbird HELIX 5 CHIRP GPS G3, or STRIKER Vivid 5cv/7cv | STRIKER Vivid 9sv side imaging on a transom plate |
| Nav lights | Attwood bi-color plus plug-in all-round | Same, plus a YakAttack VISICarbon Pro battery backup | Lumitec or Navisafe 2 nm set |
| Side and front lights | LED strip | LED courtesy pucks plus a small bow flood | Lumitec deck flood plus courtesy lights |
| Mount base | Starboard plates | YakAttack GearTrac GT90 on both shelves | Longer track runs plus RAM or YakAttack arms |
| Anchor | Grapnel to the bow cleat | Anchor trolley plus stake-out pole | Power-Pole Micro Anchor |
| Paddle or oars | Telescoping paddle | Side-mount oarlocks plus 6.5–7 ft oars | Starboard oarlock risers plus composite oars |
| Decking | Generic EVA sheet | SeaDek or Hydro-Turf DIY sheets | Custom CNC-cut SeaDek kit |
| Parts total | About $655 | About $1,800–2,100 | About $4,300–5,000 |
Battery and power
Section titled “Battery and power”Minn Kota’s wiring guide calls for a 12 V deep-cycle marine battery, ideally at least 110 Ah in lead-acid, and rates Group 27 “better” and Group 31 “best”.
Runtime (general estimate): at the Endura’s full 30 A, a 100 Ah lead-acid battery (about 50 Ah usable) lasts about 1.7 hours, a 75 Ah Group 24 about 1.2 hours, and a 50 Ah lithium about 1.6 hours. At the mid speeds used most of the day, it’s several hours. Recharge within 12 to 24 hours of every trip; Minn Kota says skipping that is the leading cause of early lead-acid failure.
Trolling motor circuit
Section titled “Trolling motor circuit”| Endura | Max draw | Breaker | Wire (5 / 10 / 15 ft run) |
|---|---|---|---|
| C2 30 lb (this boat) | 30 A | 40 A (to confirm) | Don’t extend or alter the factory 5 ft 10 AWG leads |
| C2 40 / 45 lb | 42 A | 50 A | 8 / 6 / 4 AWG |
| C2 50 / 55 lb | 50 A | 60 A | 8 / 4 / 2 AWG |
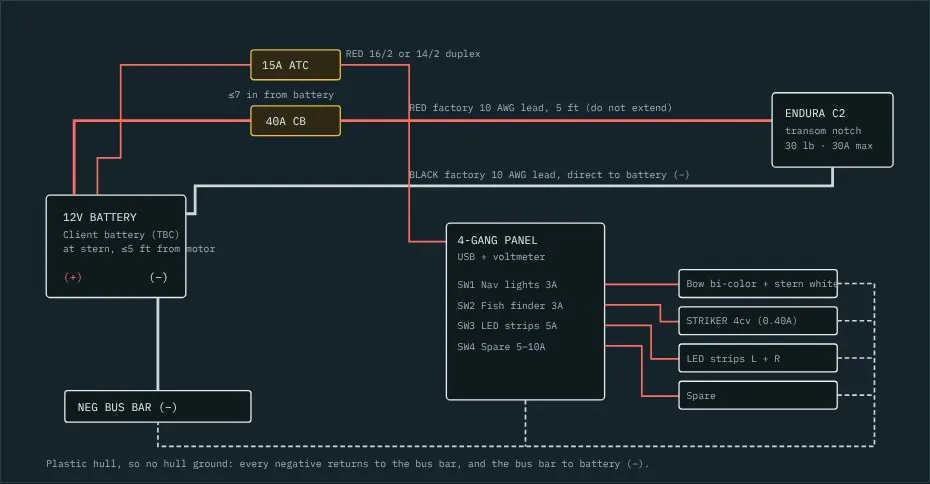
The black factory lead goes straight to battery negative. The red lead lands on the breaker’s load stud, with a short red 10 AWG jumper from the breaker’s line stud to battery positive. Minn Kota doesn’t publish a breaker size for the 30 lb motor on the pages cited; 40 A is about 1.25 times the 30 A max draw and protects the 10 AWG leads. The plan says to confirm that with Minn Kota support before installing. The factory pre-wire in the hull isn’t used for the motor.
Switch panel
Section titled “Switch panel”All lighting and electronics run through one sealed 4-gang panel. Its voltmeter doubles as the battery gauge. The accessory feed is a 15 A inline fuse at the battery positive post, with red and black 16/2 (or 14/2) duplex to the panel and a negative bus bar on the battery box.
| Switch | Circuit | Fuse | Wire | Load |
|---|---|---|---|---|
| SW1 | Nav lights (bow bi-color and stern all-round) | 3 A | 16 AWG duplex | About 0.2–0.5 A (est.) |
| SW2 | Fish finder | 3 A | 16 AWG (Garmin cable) | 0.40 A (verified) |
| SW3 | Side LED strips | 5 A | 16 AWG duplex | About 0.5–1 A (est.) |
| SW4 | Spare (bow flood, aerator, bilge) | 5–10 A | 16 or 14 AWG | Per device |
| USB / volt | Built in | Panel | — | Up to 4.2 A |
Fish finder
Section titled “Fish finder”The STRIKER Vivid 4cv kit includes trolling-motor hardware for its GT20-TM transducer, so it clamps to the Endura shaft with no holes in the hull and aims wherever the motor points. For side imaging (high tier), the transducer moves to a Starboard transom plate. A shoot-through-hull mount only works through a single solid wall, which isn’t confirmed for this hull.
Lighting
Section titled “Lighting”- Nav lights: under USCG Inland Rule 23, a power-driven vessel under 7 m with a top speed of 7 knots or less may show a single all-round white light, and should show sidelights if practicable. The plan fits both a bi-color bow light and an all-round stern light, the clean and unambiguous setup. (Rule wording from general knowledge; confirm with USCG NavCen.)
- Courtesy lights: LED strips under both gunwale lips light the cockpit for rigging and landing fish. Use them at anchor or at the ramp, not underway, because they can be mistaken for nav lights and cost night vision.
- Never flashing blue or red-and-blue: those are reserved for law enforcement.
Paddle, anchor and decking
Section titled “Paddle, anchor and decking”- Paddle: a telescoping paddle in two wall clips is the backup if the battery dies. Oarlocks (mid tier) need through-bolted sockets with backing plates; the 20 in deck height makes them sit low, so risers row better.
- Anchor: the grapnel ties to the bow cleat at 7:1 scope in current. Never anchor from the stern in current or wind; the low transom can swamp.
- Decking: the floor has raised molded ribs, so a glued mat would only bond to the rib tops and peel in the heat. The floor piece is loose-laid so it lifts out to dry. Foam is glued only on flat areas (bow and stern decks, gunwale shelves), after cleaning with isopropyl alcohol, a light scuff and a PE/PP adhesion promoter such as 3M Primer 94.
Build steps
Section titled “Build steps”Tools: drill and step bit, multimeter, ratcheting crimper for 10 and 16 AWG, heat gun, stripper, utility knife and straightedge, socket set, jigsaw or hole saw for Starboard, isopropyl alcohol, painter’s tape.
Phase 0: layout and bench test (1–2 hours)
Section titled “Phase 0: layout and bench test (1–2 hours)”- Level the boat on the trailer, place every part loosely in its marked spot, and sit in the stern seat to confirm you can reach the panel, tiller and display.
- Measure every wire run along the inner wall, not across the floor. Add 12 in of slack.
- On the bench, connect battery, 15 A fuse, panel and each light and the fish finder with the real wires cut to length. Switch each circuit on, check polarity with a meter, and confirm the voltmeter reads about 12.6–12.8 V on a charged lead-acid battery.
- Photograph the bench layout. Drill only after everything works.
Phase 1: battery and trolling motor circuit (2 hours)
Section titled “Phase 1: battery and trolling motor circuit (2 hours)”- Place the battery box at the stern, centered, so the 5 ft leads reach with slack for tilting and steering. Through-bolt stainless eye straps with fender washers and butyl tape.
- Mount the 40 A breaker on a 4 × 4 in Starboard pad within 7 in of the positive post.
- Route the motor leads in split loom. Don’t cut, splice or extend them. Black to battery negative, red to the breaker load stud.
- Fit the red 10 AWG jumper from battery positive to the breaker line stud, and boot both posts.
- Connect the battery with the breaker tripped, reset it, and run the motor through every speed with the prop clear or in the water.
Phase 2: switch panel and accessory feed (2–3 hours)
Section titled “Phase 2: switch panel and accessory feed (2–3 hours)”- Cut an 8 × 6 in Starboard plate for the panel and the display bracket and mount it on the gunwale shelf with #10 well nuts or through-bolts, bedded in butyl tape.
- Mount the panel, fit the 15 A inline fuse at battery positive, run duplex to the panel, and mount the negative bus bar on the battery box.
- Swap each switch fuse to the table values and label every switch.
Phase 3: fish finder (1–1.5 hours)
Section titled “Phase 3: fish finder (1–1.5 hours)”- Clamp the transducer to the Endura shaft a few inches above the lower unit, face straight down, with a loose cable loop for tilt and steering.
- Bolt the tilt/swivel bracket to the plate. Red to the SW2 output, black to the bus bar, routed away from the motor leads to cut sonar interference.
- Check the depth reading at the ramp and adjust the transducer angle if bottom returns are weak.
Phase 4: navigation lights (2 hours)
Section titled “Phase 4: navigation lights (2 hours)”- Bow light on the bow deck centerline with a Starboard backing plate if reachable, sealed in butyl tape.
- Stern base where the pole clears the motor head and doesn’t block tilting.
- 16/2 from SW1 forward to the bow and a short branch to the stern, with grommets at every pass-through and a drip loop before each fixture.
- Test after dark: red to port, green to starboard, white all around.
Phase 5: side LED strips (1 hour)
Section titled “Phase 5: side LED strips (1 hour)”- Clean the underside of each gunwale lip and apply adhesion promoter.
- Stick the strips and add a clip every 12 in, because adhesive alone won’t hold on polyethylene.
- Join both to a 16/2 run from SW3 with heat-shrink butt connectors, and seal each cut end with its cap and silicone.
Phase 6: paddle, anchor and decking (2–3 hours)
Section titled “Phase 6: paddle, anchor and decking (2–3 hours)”- Mount the paddle clips with well nuts.
- Tie the anchor with a seized bowline, mark the line at 20, 30 and 40 ft, and keep it in a mesh bag at the bow.
- Template the floor with kraft paper, cut the EVA with a fresh blade against a straightedge, notch for the seat pedestals and drain, and lay it loose. Glue only flat areas, after primer, above 70°F.
Phase 7: registration and final check (1 hour plus mail time)
Section titled “Phase 7: registration and final check (1 hour plus mail time)”- Find the HIN on the transom. If it’s missing or unreadable, ask DNR about a HIN inspection first.
- Register online at GoOutdoorsGeorgia.com, by phone or by mail. Decals arrive in about two weeks.
- Apply 3 in block numbers and the decals on both sides of the bow.
- On the water: test every switch, check the breaker and fuses stay cool after 30 minutes at full throttle, and look for chafe at every clamp.
Drilling a rotomolded hull
Section titled “Drilling a rotomolded hull”- Drill above the waterline only.
- Drill a small pilot first and probe behind it with a bent wire to see if the wall is solid, hollow or foam-filled.
- Through-bolt with fender washers or a backing plate where you can reach behind; use #10 rubber well nuts or stainless blind rivets where you can’t.
- Seal with butyl tape or a PE-compatible sealant. Not 3M 5200, which doesn’t bond well to polyethylene. A step bit cuts clean holes without cracking the plastic.
- Grommet every wire pass-through and add a drip loop on the wet side.
Georgia registration and equipment
Section titled “Georgia registration and equipment”- Registration: Georgia DNR says any boat with mechanical propulsion must be registered to operate on Georgia waters, and an electric trolling motor counts. The only listed exemption is boats used only on private ponds. Registration lasts three calendar years; Georgia issues electronic titles; trailers register separately at the county tag office.
- HIN: required on boats built after 1 November 1972. If there isn’t one, DNR does a HIN inspection.
- Numbers: both sides of the bow, left to right, block letters at least 3 in tall in a contrasting color, with the letter groups separated by spaces or hyphens.
- Boater education: required for anyone born on or after 1 January 1998 to operate a motorized vessel (third-party source; confirm with DNR).
- PFDs: one wearable USCG-approved PFD per person; children under 13 must wear one while the boat is moving. No throwable required under 16 ft.
- Also required: a sound device (a whistle is fine) and nav lights from sunset to sunrise and in reduced visibility.
Testing and verification
Section titled “Testing and verification”Nothing has been installed, bench tested or fit-checked on the boat. The plan builds a full bench test into Phase 0 before any hole is drilled.
Not verified: every price marked estimate; the generic panel’s specs; the hull wall construction; the factory pre-wire gauge; the Rule 23 wording; the Georgia fee, boater-education cutoff and decal placement (third-party sources); battery weights; and LED current draws.
Safety notes
Section titled “Safety notes”- 40 A breaker within 7 in of battery positive on the motor circuit; 15 A fuse at the post on the accessory feed; one small fuse per switch.
- Every negative to the bus bar, the bus bar to battery negative. No hull ground on a plastic boat.
- Boots on both battery posts; loom and clamps every 12 to 18 in along the wall; grommets at every pass-through.
- Never anchor from the stern; never fit flashing blue or red-and-blue lights.
Lessons learned
Section titled “Lessons learned”- The manufacturer’s “don’t extend the leads” decides the layout. On a small motor, the battery goes to the motor, not the other way around.
- Polyethylene changes everything about fastening and gluing. Well nuts, butyl tape and an adhesion promoter, not marine 5200.
Open items
Section titled “Open items”- Client battery: deep-cycle, chemistry, group size, Ah rating, age and resting voltage.
- Client charger: has a mode for that chemistry.
- Factory pre-wire gauge (printed on the jacket).
- Solo or two people, which sets where the passenger sits to keep the stern from riding low.
- Breaker size confirmed with Minn Kota support.
Sources
Section titled “Sources”- Quest Angler 10 hull specs (Public Lands)
- Minn Kota Trolling Motor Wiring and Battery Guide
- Minn Kota Help: amp draw, circuit breakers, fuses and extending the battery leads
- Endura C2 amp draw (Defender)
- LiTime 12V 50Ah TM and 12V 100Ah TM
- Georgia DNR Boat Registration FAQ; Dockwa Georgia guide; Boat-Ed Georgia numbering and PFD pages
- USCG NavCen, navigation rules
- Product pages for every verified price, checked 21 October 2026
Changelog
Section titled “Changelog”Project page published from plan revision E (22 October 2026). Client name, spend to date and the client photo left off.
Rollback: Revert the commit that added this page.